
How to steam milk is the first skill that transformed my morning coffee ritual. I still remember my very first homemade latte, the gentle hiss of the steam wand, the sweet aroma of warm milk, and the soft swirl of velvety foam made my kitchen feel like a tiny coffee shop. Every sip was creamy and comforting, and I couldn’t wait to try it again the next morning. If you’ve mastered your espresso, here’s how to make it even better with perfectly steamed milk at home.

Table of Contents
Table of Contents
The Story Behind Steamed Milk
How to steam milk became part of my daily ritual after a trip to Italy. I still remember walking into a tiny café in Milan early one morning. The barista was swirling fresh milk in a shiny metal pitcher, and the soft hiss of the steam filled the air with a warm, comforting aroma. I stood there, mesmerized, as she poured a stream of velvety foam over a rich shot of espresso. That first cappuccino was more than a drink, it was an experience, one that stayed with me long after I left the café.
Bringing that tradition home is what makes steaming milk so special. It’s not just about heating milk; it’s about creating a silky microfoam that transforms a simple cup of coffee into a café‑style latte or creamy breve. Every time I hold the warm pitcher and watch the foam form, I feel connected to that century‑old ritual celebrated in coffee shops around the world. According to Wikipedia, the marriage of espresso and steamed milk has been a beloved tradition for over a hundred years, and mastering it at home brings that magic into your own kitchen.
Print
How to Steam Milk for Perfect Lattes
Learn how to steam milk at home to create silky microfoam for barista-quality lattes, cappuccinos, and macchiatos. A cozy ritual that turns your kitchen into a coffee shop.
- Total Time: 5 minutes
- Yield: 1 serving 1x
Ingredients
1 cup (240 ml) fresh whole milk or oat milk
Espresso shots (1-2 per cup)
A metal milk steaming pitcher
Steam wand or handheld frother
Thermometer (optional, for 150°F target)
Instructions
- Prepare your espresso and milk: Brew 1-2 shots of espresso in your favorite clear glass mug. Pour cold, fresh milk into a metal pitcher and optionally chill it for 1-2 minutes to give more time for steaming.
- Steam and stretch the milk: Position the steam wand just under the surface and tilt the pitcher slightly to start stretching the milk. Listen for a gentle hiss while creating silky microfoam. Once the milk expands by one-third, submerge the wand deeper to create a smooth vortex.
-
Finish and pour: Heat the milk to about 150°F (warm to the touch but not scalding). Swirl the pitcher to combine foam and liquid, then pour slowly into the espresso, letting the foam rise to the top for a café-quality latte.
Notes
Use fresh milk for the best foam. Whole milk or oat milk work best for silky microfoam. Avoid overheating to prevent scalded flavors. Practice makes perfect, enjoy your cozy homemade latte!
- Prep Time: 3 minutes
- Cook Time: 2 minutes
- Category: Drink
- Method: Steaming
- Cuisine: Italian-American
- Diet: Vegetarian
Nutrition
- Serving Size: 1 latte
- Calories: 120
- Sugar: 12g
- Sodium: 100mg
- Fat: 4g
- Saturated Fat: 2.5g
- Unsaturated Fat: 1.5g
- Trans Fat: 0g
- Carbohydrates: 12g
- Fiber: 0g
- Protein: 6g
- Cholesterol: 15mg
Why This Recipe Works
How to steam milk at home may seem intimidating, but once you know the right technique, steaming milk becomes a simple joy. This recipe works because it focuses on creating silky microfoam and bringing out the natural sweetness of the milk for perfect lattes and cappuccinos.
How to Steam Milk for Perfect Microfoam
The secret to café‑quality drinks lies in the microfoam. By holding the steam wand just below the surface and lowering the pitcher slowly, the milk stretches with tiny, uniform bubbles. This process, often called “stretching,” is what gives milk that smooth, wet‑paint texture baristas love. When I first mastered steaming milk, I could feel the pitcher vibrate softly, hear the gentle hiss, and smell the sweet aroma rising from the foam. With this method, your homemade lattes and cappuccinos will have the same creamy top layer you expect from a coffee shop.
Texture and Aroma for Barista‑Style Drinks
Proper steaming is about more than foam, it’s about flavor and aroma. How to steam milk properly enhances its natural sweetness, especially in fresh whole milk or oat milk. The warmth releases subtle nutty notes that blend perfectly with a rich shot of espresso. Every time I pour the foam over my coffee, the first sip feels silky, cozy, and indulgent. Even a simple cappuccino turns into a café‑style treat when the texture is right, creating a little moment of comfort at home.
Health and Ingredient Tips
Choosing the right milk makes a difference. Whole milk creates the richest microfoam, 2 % milk is lighter, and oat milk froths beautifully for plant‑based drinks. Always use fresh milk, older milk won’t foam as well. According to the USDA FoodData Central, milk is a good source of protein and calcium, making every homemade cappuccino a comforting and nourishing drink. For best results, pair your steamed milk with high‑quality beans like the ones in this guide.

Step‑by‑Step Instructions + Tips
How to steam milk at home can feel intimidating, but with these step‑by‑step instructions, steaming milk becomes easy and enjoyable. By following these tips, your lattes and cappuccinos will look and taste like they came from a coffee shop.
How to Steam Milk: Prepare Your Espresso & Milk
Start with freshly brewed espresso, two shots make the perfect base for a latte or cappuccino. For the milk, choose very fresh whole milk for the creamiest foam, or oat milk if you prefer a dairy‑free option. Keep your milk cold and store your metal pitcher in the fridge before use. Colder milk gives you more time to stretch and create that silky microfoam. As the coffee brews, the rich aroma of espresso fills the air, promising the cozy drink that’s about to come together.
Steam, Stretch, and Create the Vortex
Position the steam wand just under the surface of the milk, slightly off‑center, and tilt the pitcher to start stretching. You’ll hear a gentle hiss as the milk begins to froth. Slowly lower the pitcher as the milk expands, creating tiny, uniform bubbles. Once it increases in volume by about one‑third, submerge the wand a bit deeper to create a swirling vortex. This step is key in how to steam milk correctly, combining the foam with the liquid for a smooth, café‑quality texture. Steaming milk this way fills the kitchen with a warm, sweet aroma that instantly feels like a mini coffee shop.
Finishing & Pouring for the Perfect Latte
When the milk reaches about 150 °F (or when the pitcher is just too hot to hold for more than a few seconds), turn off the steam. Wipe and purge the wand immediately to keep it clean. Swirl the pitcher gently to remove any large bubbles, then tap it on the counter to settle the microfoam. Pour slowly into the center of your espresso, letting the foam rise to the top. This final pour is the secret to turning every cappuccino or latte into a barista‑worthy drink. For more ideas, check out how to make a cappuccino and practice latte art at home.

Troubleshooting & Common Mistakes
Even when you know how to steam milk, small mistakes can keep your foam from reaching that silky, café‑quality texture. Here are the most common issues I’ve faced, and how to fix them for perfect microfoam every time.
Milk Won’t Froth? How to Steam Milk Correctly
If your milk refuses to froth, the problem is usually temperature or freshness. Cold, fresh milk stretches best, while warm or older milk often fails to foam. I always keep my milk jug in the fridge for a few minutes before steaming. Another tip: position the steam wand just under the surface, slightly off‑center, so it can pull in air and start creating microfoam. Once I learned this, my homemade cappuccinos started looking like they came from a real coffee shop.
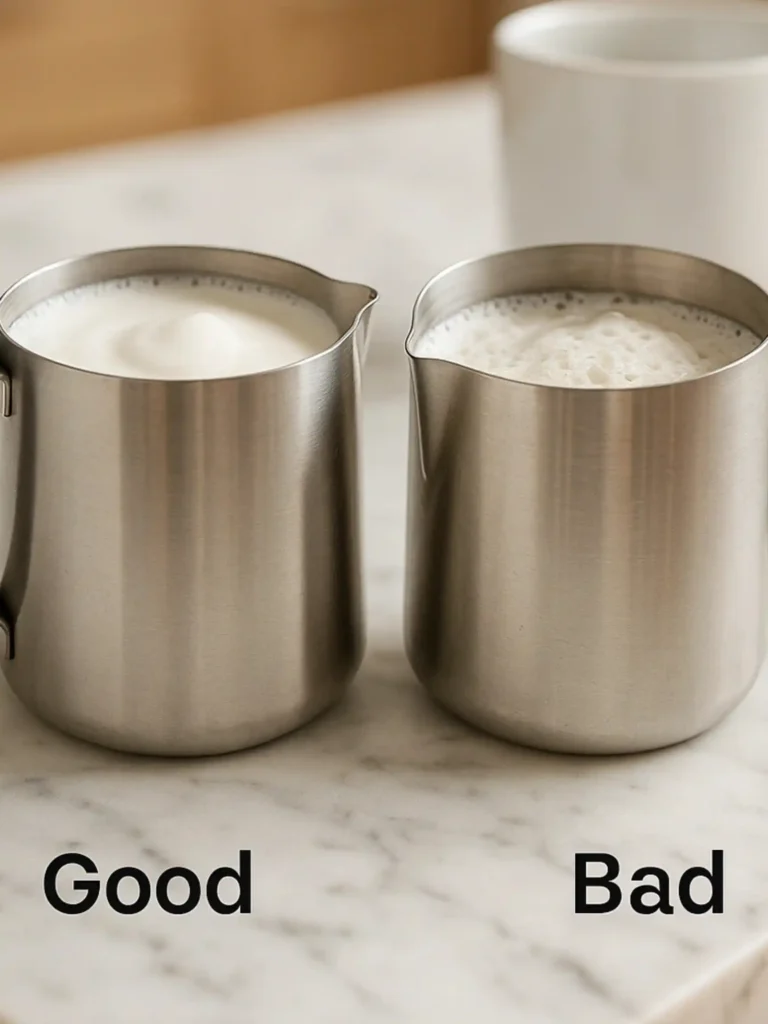
Foam is Too Bubbly or Dry
Large, dry bubbles mean the milk has stretched too much or the wand stayed at the surface for too long. To create smooth, creamy microfoam, lower the wand deeper after the initial stretch to form a swirling vortex. This blends the foam with the liquid, giving that glossy “wet paint” look. When steaming milk correctly, you should hear a soft hiss, not a loud splatter. Paying attention to sound and motion helps me fix bubbly foam every time.
Milk is Scalded or Burnt
Overheated milk loses its sweetness and can even smell burnt. The ideal steaming temperature is around 150 °F, or when the pitcher is just too hot to hold for more than a few seconds. I recommend using a thermometer or a pitcher with a heat sticker for consistency. Learning how to steam milk without scalding it will give your lattes and cappuccinos that smooth, comforting flavor you love.
Final Thoughts
Learning how to steam milk at home has completely changed the way I enjoy my morning coffee. The gentle hiss of the steam wand, the warmth of the pitcher in my hands, and the silky foam settling over rich espresso make each cup feel like a tiny coffee shop moment. Every homemade cappuccino or latte becomes an experience rather than just a drink, filling the kitchen with aroma and comfort. For latte recipes explore this guide: Best 15 Tea Party Tea Latte Recipes
With a bit of practice, how to steam milk transforms from a skill into a joyful ritual. Listen to the soft swirl, watch the foam shine like wet paint, and enjoy the reward in every sip. Once you’ve mastered your microfoam, share your creations with friends! I love seeing your latte art and cozy coffee moments, tag us on Facebook or save your favorite pours to Pinterest. Your next cappuccino could inspire someone else to create a little coffee magic at home.
FAQ
How can I steam milk at home?
Learning how to steam milk at home is easier than it looks. You need a steam wand or milk frother and cold, fresh milk. Start by positioning the steam wand just under the surface and tilt the pitcher slightly. Listen for a soft hiss as the milk stretches into microfoam. Once it grows in volume, submerge the wand a bit deeper to create a smooth vortex. In less than a minute, your milk will be ready for a homemade latte or cappuccino with café‑quality foam.
How do I steam milk without a steamer?
You can steam milk without a traditional steamer using simple tools. Heat your milk in a saucepan or microwave until warm but not boiling, then whisk vigorously or use a handheld frother to create bubbles. For the best texture, swirl the milk in the pitcher to combine the foam and liquid. While it may not match the precision of steaming milk with a wand, it still creates a cozy homemade latte experience.
Is steamed milk just heated milk?
No, steamed milk is not the same as simply heated milk. Heating warms the milk, but steaming introduces air to create microfoam and enhances its natural sweetness. This process gives your latte or cappuccino a silky, velvety texture and a more balanced flavor. Learning how to steam milk the right way turns a basic cup of coffee into a café‑style treat you can enjoy at home.
How long should it take to steam milk?
Steaming milk usually takes 30 to 60 seconds, depending on the type of milk and the power of your steam wand. Cold, fresh milk foams best, and you should aim for a temperature of about 150 °F for ideal microfoam. Listen for a soft, steady hiss, too loud means the wand is too high, and silence means it’s too deep. With a little practice, you’ll get the timing just right for perfect foam every time.
Can I steam milk in the microwave?
Yes, you can steam milk in the microwave with a few extra steps. Heat the milk in a microwave‑safe jar until warm but not boiling. Seal the jar and shake it vigorously for 20 to 30 seconds to create foam, then remove the lid and microwave for another 10 seconds to stabilize the bubbles. While it won’t match professional steaming milk results, it’s a quick way to enjoy a frothy homemade latte.